As I’ve previously mentioned we’re going on the road which of course means there’s been a ton of things to think about and organise, one of which is what would we do with money on the day. If you follow me on Instagram then you will have seen me whip up some of these aprons a few weeks ago and I’m really please with how they’ve turned out. I had a few criteria, I wanted them to have a zip, I wanted a pocket for my phone and I wanted to make them from denim so they were super durable and wouldn’t need any kind of interfacing and most importantly so the Plush Boys would be happy to wear them. I didn’t want any kind of seam at the bottom of the apron to eliminate bulk and save myself a step. You could equally use 2 smaller pieces of fabric for the aprons and sew at the bottom but for some reason I was quite set on not having a bottom seam (maybe I am worried all of my money might fall out!) These aprons would be perfect for you to use at a craft fair if you have any coming up and will keep all your pennies safe and secure. (more…)
We wanted to spoil you with a little sewing wizardry in this tutorial; this handy make up bag is just the right size for the essentials and conveniently fits in a handbag. Make one for yourself or as a gift to make someone a smile.
And the magic you ask – Odicoat! This clever gel gives fabrics a waterproof coating that is machine washable.
Then for an extra flourish we’ve gone with a lace edged zip; we’re crazy about the way they take projects to another level. Once you get to grips with them you’ll be adding them to everything too!
We wanted to spoil you with a little sewing wizardry in this tutorial; this handy make up bag is just the right size for the essentials and conveniently fits in a handbag. Make one for yourself or as a gift to make someone a smile.
And the magic you ask – Odicoat! This clever gel gives fabrics a waterproof coating that is machine washable!
Grab a cheeky 10% discount off your next Odicoat order with WATERPROOFME10 One time use per customer.
Then for an extra flourish we’ve gone with a lace edged zip; we’re crazy about the way they take projects to another level. Once you get to grips with them you’ll be adding them to everything too!
Plush, minky, cuddle fabric… whatever you like to call it! (For an update on why we don’t call the fabric “minky” in the UK like the rest of the world does see this post) There’s no mistaking the lusciousness that started me on the road to our online shop. The trouble is (for us) the last 50cm-75cm of every bolt we have can only be sold as a fabric remnant. The pile near to the centre of the bolt gets brushed up the wrong way and crushed when the weight of the rest of the fabric piles on top of it. Then it’s stored by the manufacturer for a while and in that time unfortunately the pile goes a bit wayward and no amount of stroking it puts it back to it’s former glory. The fabric isn’t permanently like this as the pile isn’t damaged per se, it’s just got a bit of bed hair so needs a little coaxing to restore it. (more…)
Following on fromthis post, this is the second part of making a child’s skirt. I’ve not split these up as it’s an arduous task making this skirt, just simply because there are a few techniques I’ve used that are very transferable outside of little girl’s skirts so I figured it’d be an easy way to to take the bits you needed.
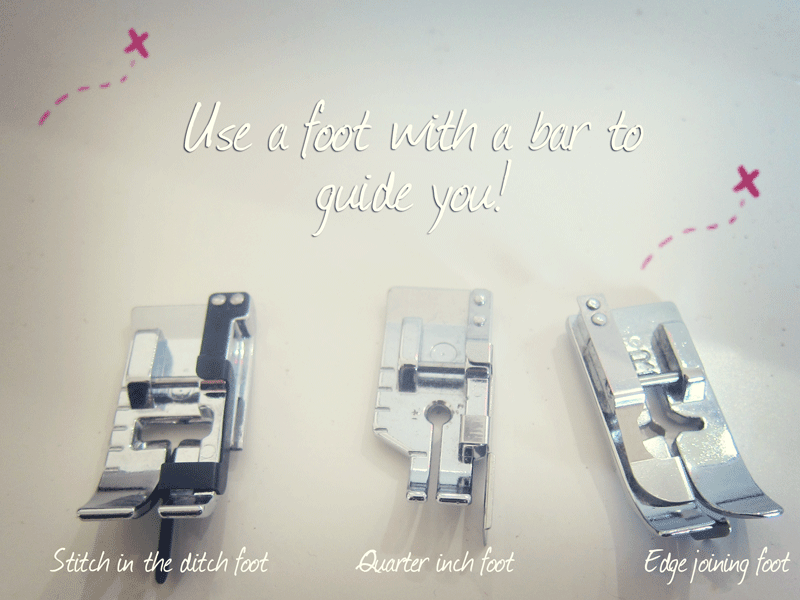
1) Use a foot with a bar
I often get comments about how neat my topstitching is and people often wonder how I can get a row of stitching so close to the edge of a garment and it be so straight! Well let me share my secret, I always use a foot to help achieve those dead straight lines. I have several “go to” feet for top stitching depending on where it is on a garment and how close to the edge I want to be. All these feet have the same thing in common – they all have a little bar that your fabric butts up against and you can use as a guide.
To provide the best experiences, we use technologies like cookies to store and/or access device information. Consenting to these technologies will allow us to process data such as browsing behavior or unique IDs on this site. Not consenting or withdrawing consent, may adversely affect certain features and functions.
Functional Always active
The technical storage or access is strictly necessary for the legitimate purpose of enabling the use of a specific service explicitly requested by the subscriber or user, or for the sole purpose of carrying out the transmission of a communication over an electronic communications network.
Preferences
The technical storage or access is necessary for the legitimate purpose of storing preferences that are not requested by the subscriber or user.
Statistics
The technical storage or access that is used exclusively for statistical purposes.The technical storage or access that is used exclusively for anonymous statistical purposes. Without a subpoena, voluntary compliance on the part of your Internet Service Provider, or additional records from a third party, information stored or retrieved for this purpose alone cannot usually be used to identify you.
Marketing
The technical storage or access is required to create user profiles to send advertising, or to track the user on a website or across several websites for similar marketing purposes.