

Are you on the hunt for plastic snap fasteners for your latest project? Maybe you’ve invested in some but are feeling a little lost on how to install them? We hope our latest blog can help with all your KAM snap worries.
First of all, what are KAM snaps? KAM snaps are a strong and durable fastener made from polyacetal resin which is super strong and OEKO-TEX certified.

Boring Legal Bit: If you follow any tutorial or guidance found in this post, or on this blog, you agree to be bound by our disclaimer which can be viewed here
They are super safe snap fasteners for clothing and the perfect alternative to buttons or metal snaps.
You need either a KAM press or KAM pliers to attach them to all kinds of projects such as clothing, coin purses and more. We have a detailed beginners blog all about KAM here.
Never miss a guide or tutorial
Click to join our mailing list!

KAM Press or Pliers?
You may have seen on our website we sell 2 types of snap fastener tools. The pliers are compatible with all shapes and sizes of KAM snaps as they come with different die sets, adjusting screw driver and plastic handled awl.
The KAM presses sit on the table top and are compatible with all shapes & sizes of KAM snaps, just ensure you have the correct die head. Our KAM presses are supplied with a free size 20 round die.
KAM Presses super easy to use & make sure your snaps are applied really securely. The pliers are great for light use, however you may prefer a KAM press if you’re looking to apply a lot of snaps.
If you are making to items to sell, especially baby items then we’d definitely recommend applying KAM snaps with a press for enhanced peace of mind that your snaps snaps won’t come off.
If you’re looking for an easy, secure and snug installation, a KAM press is the one to go for. Presses are also especially helpful if you suffer with any dexterity issues such as arthritic hands etc.
Although a press is more of an investment, it’s worth it for the professional finish which is important if you’re making to sell and a press will last you a life time.
Differences between the DK98 and the DK93
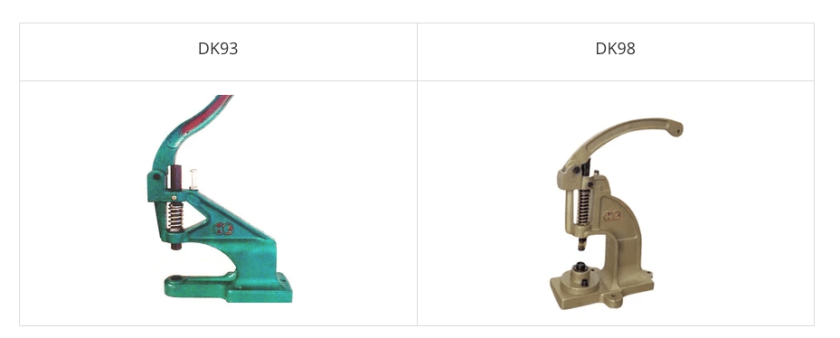
You might have noticed that there are 2 KAM presses to choose from, the DK98 and DK93.
- The DK93 has a larger gap for the fabric, meaning you can fit over triple the width between the dies compared to the DK98. This is perfect for projects where you need to install a snap quite far from the edge of your fabric, so the DK93 is a lot more versatile for a variety of projects.
- There are also several die sets available and a die set for the DK93 will never work on the DK98 and vice versa. However we will supply each KAM press bought with the correct die set to fit size 20 (T5) round dies. Then you are free to buy additional die sets for your machine to suit your making requirements.
- The upper die in the DK98 can be slower to change, due to it being held in place by a tiny screw that needs an allen key to undo. Be careful not to lose the screw or the allen key or your press will be out of action! The dies in the DK93 directly screw into the press with ease and no tools needed.
- The DK93 is also a lot lighter (approximately 4KG lighter) and slightly more compact, making it easier to move on and off your sewing table.

How to put your KAM press together
When you get the KAM press out of the box, you might feel a bit overwhelmed that you have to assemble it. Don’t worry, it’s super easy when you know how…
- Choose a smooth, flat surface to work on. Make sure it is low enough so you can extend your arm straight down when pressing the handle down. This will allow you to use your body weight to push down instead of just your arm, for a deeper press and therefore a more professional installation.
- Attach the handle with the screw.
Prefer a video tutorial? Check out our YouTube step by step video below:
How to attach KAM snaps
If you’re looking to attach KAM snaps with pliers, we have a handy step by step tutorial here on the blog. Make sure you practice on scrap fabric first before going onto your project!

Installing KAM Snaps with a Press
- To make sure to apply the right amount of pressure, place your press on a table that is low enough for you to use your shoulder for leverage.
- You will need 4 parts of the KAM plastic snap set, 2 caps, a socket and a stud.
- Put your cap die into your press and attach your outer die to the top of your press.
- Grab your inner snap and press it firmly into the outer die.
- Put your plastic cap through your fabric and place it into the cap die with the long prong facing up making sure none of the plastic is outside of the die cup.
- Press down, the die should bulge out slightly.
- The cap should be flattened and both parts firmly into your fabric.
- For the other side, swap out the die at the top of your press for the inner die.
- Take your stud and place it into the inner die.
- Get another cap and place it into the die cup with the needle facing up once again.
- Press down and fix the cap and stud together.
You should have a press stud that snaps together!
Prefer video tutorials? Check out our YouTube tutorial below.
Never miss a guide or tutorial
Click to join our mailing list!
How to remove KAM Snaps
In order to remove KAM snaps, you will need a set of KAM snap removal pliers. It’s really easy to remove both the male and female sides of the snaps. Check out our beginners guide to KAM Snaps for a step by step tutorial.


What can I make with KAM snap fastenings?
Now you can attach KAM snap fastenings, we have a ton of project ideas for you!
- Dribble Bib
- Coin Purse
- Baby Clothing
- Waterproof Jackets
- Cot Bed Duvet Cover
- Reversible Baby Bib
- Dog Bandanas

Check out our UK based sewing superstore for all of our KAM snap fastener supplies! We sell the press, pliers and lots of different colour snaps for all of your projects. New to KAM snaps? Check out our snap fastener kit.
